HTML: The Living Standard
Edition for Web Developers — Last Updated 16 January 2024
Edition for Web Developers — Last Updated 16 January 2024
button elementSupport in all current engines.
tabindex attribute
specified.disabled — Whether the form control is disabled
form — Associates the element with a form element
formaction — URL to use for form submission
formenctype — Entry list encoding type to use for form submission
formmethod — Variant to use for form submission
formnovalidate — Bypass form control validation for form submission
formtarget — Navigable for form submission
name — Name of the element to use for form submission and in the form.elements API
popovertarget — Targets a popover element to toggle, show, or hide
popovertargetaction — Indicates whether a targeted popover element is to be toggled, shown, or hidden
type — Type of button
value — Value to be used for form submission
HTMLButtonElement.The button element represents a button labeled by its contents.
The element is a button.
The type attribute
controls the behavior of the button when it is activated. It is an enumerated
attribute with the following keywords and states:
| Keyword | State | Brief description |
|---|---|---|
submit
| Submit Button | Submits the form. |
reset
| Reset Button | Resets the form. |
button
| Button | Does nothing. |
The attribute's missing value default and invalid value default are both the Submit Button state.
If the type attribute is in the Submit Button state, the element is specifically a
submit button.
The form attribute is used to explicitly associate the
button element with its form owner. The name attribute represents the element's name. The disabled attribute is used to make the control non-interactive and
to prevent its value from being submitted. The formaction,
formenctype, formmethod, formnovalidate, and formtarget attributes are attributes for form
submission.
The formnovalidate attribute can be
used to make submit buttons that do not trigger the constraint validation.
The formaction, formenctype, formmethod, formnovalidate, and formtarget must not be specified if the element's type attribute is not in the Submit Button state.
The value
attribute gives the element's value for the purposes of form submission. The element's value is the value of the element's value attribute, if there is one, or the empty string
otherwise.
A button (and its value) is only included in the form submission if the button itself was used to initiate the form submission.
The following button is labeled "Show hint" and pops up a dialog box when activated:
< button type = button
onclick = "alert('This 15-20 minute piece was composed by George Gershwin.')" >
Show hint
</ button > select elementSupport in all current engines.
option, optgroup, hr, and script-supporting elements.autocomplete — Hint for form autofill feature
disabled — Whether the form control is disabled
form — Associates the element with a form element
multiple — Whether to allow multiple values
name — Name of the element to use for form submission and in the form.elements API
required — Whether the control is required for form submission
size — Size of the control
multiple attribute or a size attribute with a value > 1: for authors; for implementers.HTMLSelectElement.The select element represents a control for selecting amongst a set of
options.
Support in all current engines.
The multiple
attribute is a boolean attribute. If the attribute is present, then the
select element represents a control for selecting zero or more options
from the list of options. If the attribute is
absent, then the select element represents a control for selecting a
single option from the list of options.
Support in all current engines.
The size attribute
gives the number of options to show to the user. The size
attribute, if specified, must have a value that is a valid non-negative integer
greater than zero.
The list of options for a select
element consists of all the option element children of the select
element, and all the option element children of all the optgroup element
children of the select element, in tree order.
Support in all current engines.
The required
attribute is a boolean attribute. When specified, the user will be required to select
a value before submitting the form.
If a select element has a required
attribute specified, does not have a multiple attribute
specified, and has a display size of 1; and if the value of the first option element in the
select element's list of options (if
any) is the empty string, and that option element's parent node is the
select element (and not an optgroup element), then that
option is the select element's placeholder label option.
If a select element has a required
attribute specified, does not have a multiple attribute
specified, and has a display size of 1, then the
select element must have a placeholder label option.
In practice, the requirement stated in the paragraph above can only apply when a
select element does not have a size attribute
with a value greater than 1.
The form attribute is used to explicitly associate the select element with its form owner.
The name attribute represents the element's name.
The disabled attribute is used to make the control non-interactive and to prevent its value from being submitted.
The autocomplete attribute controls how the user agent provides autofill behavior.
A select element that is not disabled is
mutable.
select.typeReturns "select-multiple" if the element has a multiple attribute, and "select-one"
otherwise.
select.optionsReturns an HTMLOptionsCollection of the list of options.
select.length [ = value ]Returns the number of elements in the list of options.
When set to a smaller number, truncates the number of option elements in the
select.
When set to a greater number, adds new blank option elements to the
select.
element = select.item(index)select[index]Returns the item with index index from the list of options. The items are sorted in tree order.
element = select.namedItem(name)Returns the first item with ID or name name from the list of options.
Returns null if no element with that ID could be found.
select.add(element [, before ])Inserts element before the node given by before.
The before argument can be a number, in which case element is inserted before the item with that number, or an element from the list of options, in which case element is inserted before that element.
If before is omitted, null, or a number out of range, then element will be added at the end of the list.
This method will throw a "HierarchyRequestError"
DOMException if element is an ancestor of the element into which it is
to be inserted.
select.selectedOptionsReturns an HTMLCollection of the list
of options that are selected.
select.selectedIndex [ = value ]Returns the index of the first selected item, if any, or −1 if there is no selected item.
Can be set, to change the selection.
select.value [ = value ]Returns the value of the first selected item, if any, or the empty string if there is no selected item.
Can be set, to change the selection.
select.showPicker()Shows any applicable picker UI for select, so that the user can select a value.
Throws an "InvalidStateError" DOMException if
select is not mutable.
Throws a "NotAllowedError" DOMException if called
without transient user activation.
Throws a "SecurityError" DOMException if
select is inside a cross-origin iframe.
Throws a "NotSupportedError" DOMException if
select is not being rendered.
The following example shows how a select element can be used to offer the user
with a set of options from which the user can select a single option. The default option is
preselected.
< p >
< label for = "unittype" > Select unit type:</ label >
< select id = "unittype" name = "unittype" >
< option value = "1" > Miner </ option >
< option value = "2" > Puffer </ option >
< option value = "3" selected > Snipey </ option >
< option value = "4" > Max </ option >
< option value = "5" > Firebot </ option >
</ select >
</ p > When there is no default option, a placeholder can be used instead:
< select name = "unittype" required >
< option value = "" > Select unit type </ option >
< option value = "1" > Miner </ option >
< option value = "2" > Puffer </ option >
< option value = "3" > Snipey </ option >
< option value = "4" > Max </ option >
< option value = "5" > Firebot </ option >
</ select > Here, the user is offered a set of options from which they can select any number. By default, all five options are selected.
< p >
< label for = "allowedunits" > Select unit types to enable on this map:</ label >
< select id = "allowedunits" name = "allowedunits" multiple >
< option value = "1" selected > Miner </ option >
< option value = "2" selected > Puffer </ option >
< option value = "3" selected > Snipey </ option >
< option value = "4" selected > Max </ option >
< option value = "5" selected > Firebot </ option >
</ select >
</ p > Sometimes, a user has to select one or more items. This example shows such an interface.
< label >
Select the songs from that you would like on your Act II Mix Tape:
< select multiple required name = "act2" >
< option value = "s1" > It Sucks to Be Me (Reprise)
< option value = "s2" > There is Life Outside Your Apartment
< option value = "s3" > The More You Ruv Someone
< option value = "s4" > Schadenfreude
< option value = "s5" > I Wish I Could Go Back to College
< option value = "s6" > The Money Song
< option value = "s7" > School for Monsters
< option value = "s8" > The Money Song (Reprise)
< option value = "s9" > There's a Fine, Fine Line (Reprise)
< option value = "s10" > What Do You Do With a B.A. in English? (Reprise)
< option value = "s11" > For Now
</ select >
</ label > Occasionally it can be useful to have a separator:
< label >
Select the song to play next:
< select required name = "next" >
< option value = "sr" > Random
< hr >
< option value = "s1" > It Sucks to Be Me (Reprise)
< option value = "s2" > There is Life Outside Your Apartment
…datalist elementoption and script-supporting elements.HTMLDataListElement.The datalist element represents a set of option elements that
represent predefined options for other controls. In the rendering, the datalist
element represents nothing.
The datalist element can be used in two ways. In the simplest case, the
datalist element has just option element children.
< label >
Animal:
< input name = animal list = animals >
< datalist id = animals >
< option value = "Cat" >
< option value = "Dog" >
</ datalist >
</ label > In the more elaborate case, the datalist element can be given contents that are to
be displayed for down-level clients that don't support datalist. In this case, the
option elements are provided inside a select element inside the
datalist element.
< label >
Animal:
< input name = animal list = animals >
</ label >
< datalist id = animals >
< label >
or select from the list:
< select name = animal >
< option value = "" >
< option > Cat
< option > Dog
</ select >
</ label >
</ datalist > The datalist element is hooked up to an input element using the list attribute on the input element.
Each option element that is a descendant of the datalist element,
that is not disabled, and whose value is a string that isn't the empty string, represents a
suggestion. Each suggestion has a value and a label.
datalist.optionsReturns an HTMLCollection of the option elements of the
datalist element.
optgroup elementSupport in all current engines.
select element.option and script-supporting elements.optgroup element's end tag can be omitted
if the optgroup element is
immediately followed by another optgroup element, if it is immediately followed by an
hr element, or if there is no more content in the parent
element.disabled — Whether the form control is disabled
label — User-visible label
HTMLOptGroupElement.The optgroup element represents a group of option
elements with a common label.
The element's group of option elements consists of the option
elements that are children of the optgroup element.
Support in all current engines.
The disabled attribute is a boolean
attribute and can be used to disable a group
of option elements together.
The label
attribute must be specified. Its value gives the name of the group, for the purposes of the user
interface.
There is no way to select an optgroup element. Only
option elements can be selected. An optgroup element merely provides a
label for a group of option elements.
The following snippet shows how a set of lessons from three courses could be offered in a
select drop-down widget:
< form action = "courseselector.dll" method = "get" >
< p > Which course would you like to watch today?
< p >< label > Course:
< select name = "c" >
< optgroup label = "8.01 Physics I: Classical Mechanics" >
< option value = "8.01.1" > Lecture 01: Powers of Ten
< option value = "8.01.2" > Lecture 02: 1D Kinematics
< option value = "8.01.3" > Lecture 03: Vectors
< optgroup label = "8.02 Electricity and Magnetism" >
< option value = "8.02.1" > Lecture 01: What holds our world together?
< option value = "8.02.2" > Lecture 02: Electric Field
< option value = "8.02.3" > Lecture 03: Electric Flux
< optgroup label = "8.03 Physics III: Vibrations and Waves" >
< option value = "8.03.1" > Lecture 01: Periodic Phenomenon
< option value = "8.03.2" > Lecture 02: Beats
< option value = "8.03.3" > Lecture 03: Forced Oscillations with Damping
</ select >
</ label >
< p >< input type = submit value = "▶ Play" >
</ form > option elementSupport in all current engines.
select element.datalist element.optgroup element.label attribute and a value attribute: Nothing.label attribute but no value attribute: Text.label attribute and is not a
child of a datalist element: Text that is not
inter-element whitespace.label attribute and is a child
of a datalist element: Text.option element's end tag can be omitted if
the option element is immediately followed by another option element, if
it is immediately followed by an optgroup element, if it is immediately followed by
an hr element, or if there is no more content in the parent element.disabled — Whether the form control is disabled
label — User-visible label
selected — Whether the option is selected by default
value — Value to be used for form submission
HTMLOptionElement.The option element represents an option in a select
element or as part of a list of suggestions in a datalist element.
In certain circumstances described in the definition of the select element, an
option element can be a select element's placeholder label
option. A placeholder label option does not represent an actual option, but
instead represents a label for the select control.
Support in all current engines.
The disabled
attribute is a boolean attribute. An option element is disabled if its disabled attribute is present or if it is a child of an
optgroup element whose disabled
attribute is present.
The label
attribute provides a label for element. The label of an
option element is the value of the label
content attribute, if there is one and its value is not the empty string, or, otherwise, the value
of the element's text IDL attribute.
The label content attribute, if specified, must not be
empty.
The value
attribute provides a value for element. The value of an
option element is the value of the value
content attribute, if there is one, or, if there is not, the value of the element's text IDL attribute.
The selected
attribute is a boolean attribute. It represents the default selectedness of the element.
A select element whose multiple
attribute is not specified must not have more than one descendant option element with
its selected attribute set.
option.selectedReturns true if the element is selected, and false otherwise.
Can be set, to override the current state of the element.
option.indexReturns the index of the element in its select element's options list.
option.formReturns the element's form element, if any, or null otherwise.
option.textSame as textContent, except that spaces are collapsed and script
elements are skipped.
option = new Option([ text [, value [, defaultSelected [, selected ] ] ] ])Returns a new option element.
The text argument sets the contents of the element.
The value argument sets the value
attribute.
The defaultSelected argument sets the selected attribute.
The selected argument sets whether or not the element is selected. If it is omitted, even if the defaultSelected argument is true, the element is not selected.
textarea elementSupport in all current engines.
autocomplete — Hint for form autofill feature
cols — Maximum number of characters per line
dirname — Name of form control to use for sending the element's directionality in form submission
disabled — Whether the form control is disabled
form — Associates the element with a form element
maxlength — Maximum length of value
minlength — Minimum length of value
name — Name of the element to use for form submission and in the form.elements API
placeholder — User-visible label to be placed within the form control
readonly — Whether to allow the value to be edited by the user
required — Whether the control is required for form submission
rows — Number of lines to show
wrap — How the value of the form control is to be wrapped for form submission
HTMLTextAreaElement.The textarea element represents a multiline plain text edit
control. The contents of the control represent the control's default value.
The readonly attribute is a boolean
attribute used to control whether the text can be edited by the user or not.
In this example, a text control is marked read-only because it represents a read-only file:
Filename: < code > /etc/bash.bashrc</ code >
< textarea name = "buffer" readonly >
# System-wide .bashrc file for interactive bash(1) shells.
# To enable the settings / commands in this file for login shells as well,
# this file has to be sourced in /etc/profile.
# If not running interactively, don't do anything
[ -z "$PS1" ] && return
...</ textarea > The cols
attribute specifies the expected maximum number of characters per line. If the cols attribute is specified, its value must be a valid
non-negative integer greater than zero.
The rows
attribute specifies the number of lines to show. If the rows attribute is specified, its value must be a valid
non-negative integer greater than zero.
The wrap
attribute is an enumerated attribute with the following keywords and states:
| Keyword | State | Brief description |
|---|---|---|
soft
| Soft | Text is not to be wrapped when submitted (though can still be wrapped in the rendering). |
hard
| Hard | Text is to have newlines added by the user agent so that the text is wrapped when it is submitted. |
The attribute's missing value default and invalid value default are both the Soft state.
If the element's wrap attribute is in the Hard state, the cols attribute must be specified.
The maxlength attribute is a form control maxlength attribute.
If the textarea element has a maximum allowed value length, then the
element's children must be such that the length of the value of the element's
descendant text content with newlines
normalized is equal to or less than the element's maximum allowed value
length.
The minlength attribute is a form control minlength attribute.
The required attribute is a boolean
attribute. When specified, the user will be required to enter a value before submitting the
form.
The placeholder attribute represents a short
hint (a word or short phrase) intended to aid the user with data entry when the control has no
value. A hint could be a sample value or a brief description of the expected format.
The placeholder attribute should not be used as
an alternative to a label. For a longer hint or other advisory text, the title attribute is more appropriate.
These mechanisms are very similar but subtly different: the hint given by the
control's label is shown at all times; the short hint given in the placeholder attribute is shown before the user enters a
value; and the hint in the title attribute is shown when the user
requests further help.
The name attribute represents the element's name.
The dirname attribute controls how the element's directionality is submitted.
The disabled attribute is used to make the control
non-interactive and to prevent its value from being submitted.
The form attribute is used to explicitly associate the
textarea element with its form owner.
The autocomplete attribute controls how the user agent
provides autofill behavior.
textarea.typeReturns the string "textarea".
textarea.valueReturns the current value of the element.
Can be set, to change the value.
Here is an example of a textarea being used for unrestricted free-form text input
in a form:
< p > If you have any comments, please let us know: < textarea cols = 80 name = comments ></ textarea ></ p > To specify a maximum length for the comments, one can use the maxlength attribute:
< p > If you have any short comments, please let us know: < textarea cols = 80 name = comments maxlength = 200 ></ textarea ></ p > To give a default value, text can be included inside the element:
< p > If you have any comments, please let us know: < textarea cols = 80 name = comments > You rock!</ textarea ></ p > You can also give a minimum length. Here, a letter needs to be filled out by the user; a template (which is shorter than the minimum length) is provided, but is insufficient to submit the form:
< textarea required minlength = "500" > Dear Madam Speaker,
Regarding your letter dated ...
...
Yours Sincerely,
...</ textarea > A placeholder can be given as well, to suggest the basic form to the user, without providing an explicit template:
< textarea placeholder = "Dear Francine,
They closed the parks this week, so we won't be able to
meet your there. Should we just have dinner?
Love,
Daddy" ></ textarea > To have the browser submit the directionality of the element along with the
value, the dirname attribute can be specified:
< p > If you have any comments, please let us know (you may use either English or Hebrew for your comments):
< textarea cols = 80 name = comments dirname = comments.dir ></ textarea ></ p > output elementSupport in all current engines.
for — Specifies controls from which the output was calculated
form — Associates the element with a form element
name — Name of the element to use in the form.elements API.HTMLOutputElement.The output element represents the result of a calculation performed
by the application, or the result of a user action.
This element can be contrasted with the samp element, which is the
appropriate element for quoting the output of other programs run previously.
Support in all current engines.
The for content
attribute allows an explicit relationship to be made between the result of a calculation and the
elements that represent the values that went into the calculation or that otherwise influenced the
calculation. The for attribute, if specified, must contain a
string consisting of an unordered set of unique space-separated tokens, none of which
are identical to another token and each of which must have the value of an ID of an element in the same tree.
The form attribute is used to explicitly associate the
output element with its form owner. The name attribute represents the element's name. The output
element is associated with a form so that it can be easily referenced from the event
handlers of form controls; the element's value itself is not submitted when the form is
submitted.
output.value [ = value ]Returns the element's current value.
Can be set, to change the value.
output.defaultValue [ = value ]Returns the element's current default value.
Can be set, to change the default value.
output.typeReturns the string "output".
A simple calculator could use output for its display of calculated results:
< form onsubmit = "return false" oninput = "o.value = a.valueAsNumber + b.valueAsNumber" >
< input id = a type = number step = any > +
< input id = b type = number step = any > =
< output id = o for = "a b" ></ output >
</ form > In this example, an output element is used to report the results of a calculation performed by a remote
server, as they come in:
< output id = "result" ></ output >
< script >
var primeSource = new WebSocket( 'ws://primes.example.net/' );
primeSource. onmessage = function ( event) {
document. getElementById( 'result' ). value = event. data;
}
</ script > progress elementSupport in all current engines.
progress element descendants.value — Current value of the element
max — Upper bound of range
HTMLProgressElement.The progress element represents the completion progress of a task.
The progress is either indeterminate, indicating that progress is being made but that it is not
clear how much more work remains to be done before the task is complete (e.g. because the task is
waiting for a remote host to respond), or the progress is a number in the range zero to a maximum,
giving the fraction of work that has so far been completed.
Support in all current engines.
There are two attributes that determine the current task completion represented by the element.
The value
attribute specifies how much of the task has been completed, and the max attribute specifies how much work
the task requires in total. The units are arbitrary and not specified.
To make a determinate progress bar, add a value attribute with the current progress (either a number from
0.0 to 1.0, or, if the max attribute is specified, a number
from 0 to the value of the max attribute). To make an
indeterminate progress bar, remove the value
attribute.
Authors are encouraged to also include the current value and the maximum value inline as text inside the element, so that the progress is made available to users of legacy user agents.
Here is a snippet of a web application that shows the progress of some automated task:
< section >
< h2 > Task Progress</ h2 >
< p > Progress: < progress id = p max = 100 >< span > 0</ span > %</ progress ></ p >
< script >
var progressBar = document. getElementById( 'p' );
function updateProgress( newValue) {
progressBar. value = newValue;
progressBar. getElementsByTagName( 'span' )[ 0 ]. textContent = newValue;
}
</ script >
</ section > (The updateProgress() method in this example would be called by some
other code on the page to update the actual progress bar as the task progressed.)
The value and max attributes, when present, must have values that are valid floating-point numbers. The value attribute, if present, must have a value equal to or
greater than zero, and less than or equal to the value of the max attribute, if present, or 1.0, otherwise. The max attribute, if present, must have a value greater than
zero.
The progress element is the wrong element to use for something that
is just a gauge, as opposed to task progress. For instance, indicating disk space usage using
progress would be inappropriate. Instead, the meter element is available
for such use cases.
progress.positionFor a determinate progress bar (one with known current and maximum values), returns the result of dividing the current value by the maximum value.
For an indeterminate progress bar, returns −1.
meter elementSupport in all current engines.
meter element descendants.value — Current value of the element
min — Lower bound of range
max — Upper bound of range
low — High limit of low range
high — Low limit of high range
optimum — Optimum value in gauge
HTMLMeterElement.The meter element represents a scalar measurement within a known
range, or a fractional value; for example disk usage, the relevance of a query result, or the
fraction of a voting population to have selected a particular candidate.
This is also known as a gauge.
The meter element should not be used to indicate progress (as in a progress bar).
For that role, HTML provides a separate progress element.
The meter element also does not represent a scalar value of arbitrary
range — for example, it would be wrong to use this to report a weight, or height, unless
there is a known maximum value.
There are six attributes that determine the semantics of the gauge represented by the element.
Support in all current engines.
Support in all current engines.
The min attribute
specifies the lower bound of the range, and the max attribute specifies the upper bound. The value attribute specifies
the value to have the gauge indicate as the "measured" value.
The other three attributes can be used to segment the gauge's range into "low", "medium", and
"high" parts, and to indicate which part of the gauge is the "optimum" part. The low attribute specifies the range that is
considered to be the "low" part, and the high attribute specifies the range that is considered to be
the "high" part. The optimum attribute gives the position that is "optimum";
if that is higher than the "high" value then this indicates that the higher the value, the better;
if it's lower than the "low" mark then it indicates that lower values are better, and naturally if
it is in between then it indicates that neither high nor low values are good.
The value attribute must be specified. The value, min, low, high, max, and optimum attributes,
when present, must have values that are valid
floating-point numbers.
In addition, the attributes' values are further constrained:
Let value be the value attribute's
number.
If the min attribute is specified, then let minimum be that attribute's value; otherwise, let it be zero.
If the max attribute is specified, then let maximum be that attribute's value; otherwise, let it be 1.0.
The following inequalities must hold, as applicable:
low ≤ maximum (if low is specified)high ≤ maximum (if high is specified)optimum ≤ maximum (if optimum is specified)low ≤ high (if
both low and high are
specified)If no minimum or maximum is specified, then the range is assumed to be 0..1, and the value thus has to be within that range.
Authors are encouraged to include a textual representation of the gauge's state in the
element's contents, for users of user agents that do not support the meter
element.
When used with microdata, the meter element's value attribute provides the element's machine-readable value.
The following examples show three gauges that would all be three-quarters full:
Storage space usage: < meter value = 6 max = 8 > 6 blocks used (out of 8 total)</ meter > Voter turnout: < meter value = 0.75 >< img alt = "75%" src = "graph75.png" ></ meter > Tickets sold: < meter min = "0" max = "100" value = "75" ></ meter > The following example is incorrect use of the element, because it doesn't give a range (and since the default maximum is 1, both of the gauges would end up looking maxed out):
< p > The grapefruit pie had a radius of < meter value = 12 > 12cm</ meter >
and a height of < meter value = 2 > 2cm</ meter > .</ p > <!-- BAD! --> Instead, one would either not include the meter element, or use the meter element with a defined range to give the dimensions in context compared to other pies:
< p > The grapefruit pie had a radius of 12cm and a height of
2cm.</ p >
< dl >
< dt > Radius: < dd > < meter min = 0 max = 20 value = 12 > 12cm</ meter >
< dt > Height: < dd > < meter min = 0 max = 10 value = 2 > 2cm</ meter >
</ dl > There is no explicit way to specify units in the meter element, but the units may
be specified in the title attribute in free-form text.
The example above could be extended to mention the units:
< dl >
< dt > Radius: < dd > < meter min = 0 max = 20 value = 12 title = "centimeters" > 12cm</ meter >
< dt > Height: < dd > < meter min = 0 max = 10 value = 2 title = "centimeters" > 2cm</ meter >
</ dl > The following markup:
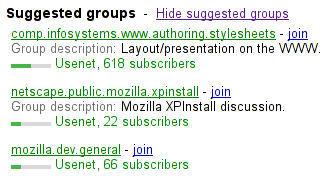
< h3 > Suggested groups</ h3 >
< menu >
< li >< a href = "?cmd=hsg" onclick = "hideSuggestedGroups()" > Hide suggested groups</ a ></ li >
</ menu >
< ul >
< li >
< p >< a href = "/group/comp.infosystems.www.authoring.stylesheets/view" > comp.infosystems.www.authoring.stylesheets</ a > -
< a href = "/group/comp.infosystems.www.authoring.stylesheets/subscribe" > join</ a ></ p >
< p > Group description: < strong > Layout/presentation on the WWW.</ strong ></ p >
< p > < meter value = "0.5" > Moderate activity,</ meter > Usenet, 618 subscribers</ p >
</ li >
< li >
< p >< a href = "/group/netscape.public.mozilla.xpinstall/view" > netscape.public.mozilla.xpinstall</ a > -
< a href = "/group/netscape.public.mozilla.xpinstall/subscribe" > join</ a ></ p >
< p > Group description: < strong > Mozilla XPInstall discussion.</ strong ></ p >
< p > < meter value = "0.25" > Low activity,</ meter > Usenet, 22 subscribers</ p >
</ li >
< li >
< p >< a href = "/group/mozilla.dev.general/view" > mozilla.dev.general</ a > -
< a href = "/group/mozilla.dev.general/subscribe" > join</ a ></ p >
< p > < meter value = "0.25" > Low activity,</ meter > Usenet, 66 subscribers</ p >
</ li >
</ ul > Might be rendered as follows:
User agents combine the value of the title attribute and the other attributes to provide context-sensitive
help or inline text detailing the actual values.
For example, the following snippet:
< meter min = 0 max = 60 value = 23.2 title = seconds ></ meter > ...might cause the user agent to display a gauge with a tooltip saying "Value: 23.2 out of 60." on one line and "seconds" on a second line.
The following example shows how a gauge could fall back to localized or pretty-printed text.
< p > Disk usage: < meter min = 0 value = 170261928 max = 233257824 > 170 261 928 bytes used
out of 233 257 824 bytes available</ meter ></ p > fieldset elementSupport in all current engines.
legend element, followed by flow content.disabled — Whether the descendant form controls, except any inside legend, are disabled
form — Associates the element with a form element
name — Name of the element to use in the form.elements API.HTMLFieldSetElement.The fieldset element represents a set of form controls (or other
content) grouped together, optionally with a caption. The caption is given by the first
legend element that is a child of the fieldset element, if any. The
remainder of the descendants form the group.
Element/fieldset#attr-disabled
Support in all current engines.
The disabled attribute, when specified, causes all the
form control descendants of the fieldset element, excluding those that are
descendants of the fieldset element's first legend element child, if
any, to be disabled.
A fieldset element is a disabled
fieldset if it matches any of the following conditions:
disabled attribute is specified
fieldset element whose disabled attribute is specified, and is not a
descendant of that fieldset element's first legend element child, if
any.The form attribute is used to explicitly associate the
fieldset element with its form owner. The name attribute represents the element's name.
fieldset.typeReturns the string "fieldset".
fieldset.elementsReturns an HTMLCollection of the form controls in the element.
This example shows a fieldset element being used to group a set of related
controls:
< fieldset >
< legend > Display</ legend >
< p >< label >< input type = radio name = c value = 0 checked > Black on White</ label >
< p >< label >< input type = radio name = c value = 1 > White on Black</ label >
< p >< label >< input type = checkbox name = g > Use grayscale</ label >
< p >< label > Enhance contrast < input type = range name = e list = contrast min = 0 max = 100 value = 0 step = 1 ></ label >
< datalist id = contrast >
< option label = Normal value = 0 >
< option label = Maximum value = 100 >
</ datalist >
</ fieldset > The following snippet shows a fieldset with a checkbox in the legend that controls whether or not the fieldset is enabled. The contents of the fieldset consist of two required text controls and an optional year/month control.
< fieldset name = "clubfields" disabled >
< legend > < label >
< input type = checkbox name = club onchange = "form.clubfields.disabled = !checked" >
Use Club Card
</ label > </ legend >
< p >< label > Name on card: < input name = clubname required ></ label ></ p >
< p >< label > Card number: < input name = clubnum required pattern = "[-0-9]+" ></ label ></ p >
< p >< label > Expiry date: < input name = clubexp type = month ></ label ></ p >
</ fieldset > You can also nest fieldset elements. Here is an example expanding on the previous
one that does so:
< fieldset name = "clubfields" disabled >
< legend > < label >
< input type = checkbox name = club onchange = "form.clubfields.disabled = !checked" >
Use Club Card
</ label > </ legend >
< p >< label > Name on card: < input name = clubname required ></ label ></ p >
< fieldset name = "numfields" >
< legend > < label >
< input type = radio checked name = clubtype onchange = "form.numfields.disabled = !checked" >
My card has numbers on it
</ label > </ legend >
< p >< label > Card number: < input name = clubnum required pattern = "[-0-9]+" ></ label ></ p >
</ fieldset >
< fieldset name = "letfields" disabled >
< legend > < label >
< input type = radio name = clubtype onchange = "form.letfields.disabled = !checked" >
My card has letters on it
</ label > </ legend >
< p >< label > Card code: < input name = clublet required pattern = "[A-Za-z]+" ></ label ></ p >
</ fieldset >
</ fieldset > In this example, if the outer "Use Club Card" checkbox is not checked, everything inside the
outer fieldset, including the two radio buttons in the legends of the two nested
fieldsets, will be disabled. However, if the checkbox is checked, then the radio
buttons will both be enabled and will let you select which of the two inner
fieldsets is to be enabled.
This example shows a grouping of controls where the legend element both labels
the grouping, and the nested heading element surfaces the grouping in the document outline:
< fieldset >
< legend > < h2 >
How can we best reach you?
</ h2 > </ legend >
< p > < label >
< input type = radio checked name = contact_pref >
Phone
</ label > </ p >
< p > < label >
< input type = radio name = contact_pref >
Text
</ label > </ p >
< p > < label >
< input type = radio name = contact_pref >
Email
</ label > </ p >
</ fieldset > legend elementSupport in all current engines.
fieldset element.HTMLLegendElement.The legend element represents a caption for the rest of the contents
of the legend element's parent fieldset element.
legend.formReturns the element's form element, if any, or null otherwise.